What you need:
- Paper plates.
- Cardboard tube.
- Tape.
- Scissors.
- Smaller balls or race cars.

Directions:
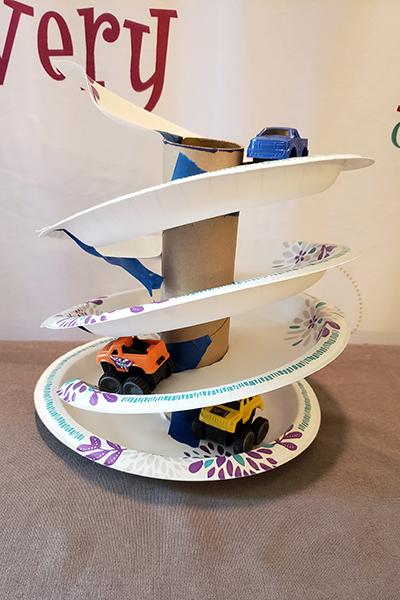
- Use the cardboard tube end to trace a circle on the bottom center of all paper plates. The number of plates depends on how long the cardboard tube is and how close together you prefer the plates to be. We recommend using four plates for a paper towel roll so that your ramp will be long enough and you will still be able to see your object roll down your ramp.
- Cut out the circle on each of the plates. Make sure the cardboard tube fits through each hole in every plate.
- Create a foundation and catch tray with one of the plates by taping the plate to the cardboard tube. Make sure the top of the plate is facing the rest of the cardboard tube at one end of the cardboard.
- Cut in a straight line from the outside edge to the center on all of the remaining plates.
- Thread the cardboard tube through all of the cut plates and line up the plates so their straight line cuts are stacked on top of each other.
- Tape the left side of the top plate to the top of the cardboard tube and the right side of the top plate to the left side of the plate just below the top.
- Continue taping the left side of the cut plate the right side of the plate above it until you have the right side of the 2nd to the bottom plate left.
- Tape the right side of the second plate to the bottom plate to the catch plate.
- Create an even space between all of the plates and tape the plates to the cardboard tube.
- Test the ball/race car. Adjust the plates as needed and continue to experiment!
Ways to expand:
- Create two towers of paper plate ramps and engineer a ramp that connects the two so that the race car or ball can travel around both structures in one run.
- Test the ramp to see what happens when you send different materials down the ramp. Try a square block, a paper clip, or some water!
- The ramp is an example of a spiral. Spirals are common in nature and art. Find other examples of a spiral in your home or yard, or make art using spirals. Do you see a spiral in the picture below?

What kids learn:
- Basic engineering skills. Engineers solve problems with constraints. They learn to solve problems by using the engineering design process: asking questions, coming up with solutions, building, testing and improving.
- Fine motor skills. Kids practice using the small muscles in their hands later used for writing.
- Experimentation! When kids experiment, they're learning how to learn. Failure is an important part of experimenting, so let kids try things that won’t work. It’s how they figure things out!

Vocabulary:
- Spiral. A special curve that starts at a point and goes around and around. Unlike a circle, the curve gets further from the center as you go around the spiral.
- Force. Energy caused by a push or a pull, in this case, the pull created by gravity!
- Constraint. A limitation or restriction. Materials, time, and space are common constraints. Real engineers have to work around constraints all the time!

